Seems like staying home is going to become the new norm for a while, so why not pick up a hobby or two to keep yourself occupied? Here’s 5 crafting hobbies you can start for under $20.
1. Making Coasters
It seems like you can never have enough coasters, because when you need one you can’t find one. That’s why you should try making some coasters in this down time.
Sift through your kitchen drawers and that shoebox worth of crafting materials that’s been collecting dust and get crafting!
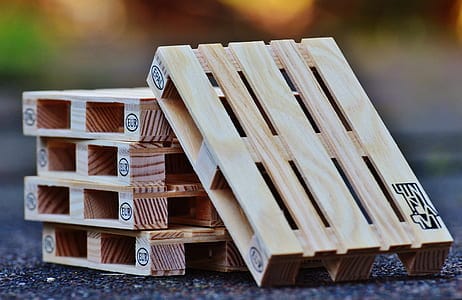
Let’s make some Mini-Pallet Coasters!
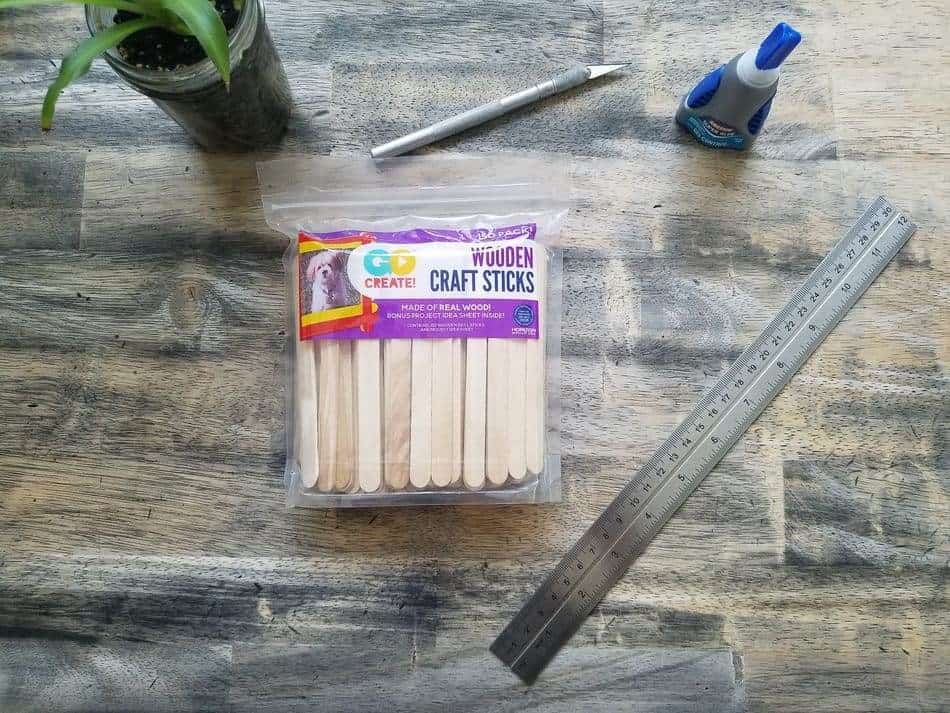
Here’s what you’ll need:
Approximate Cost: $18
- Super Glue / Wood Glue – ($1-$3)
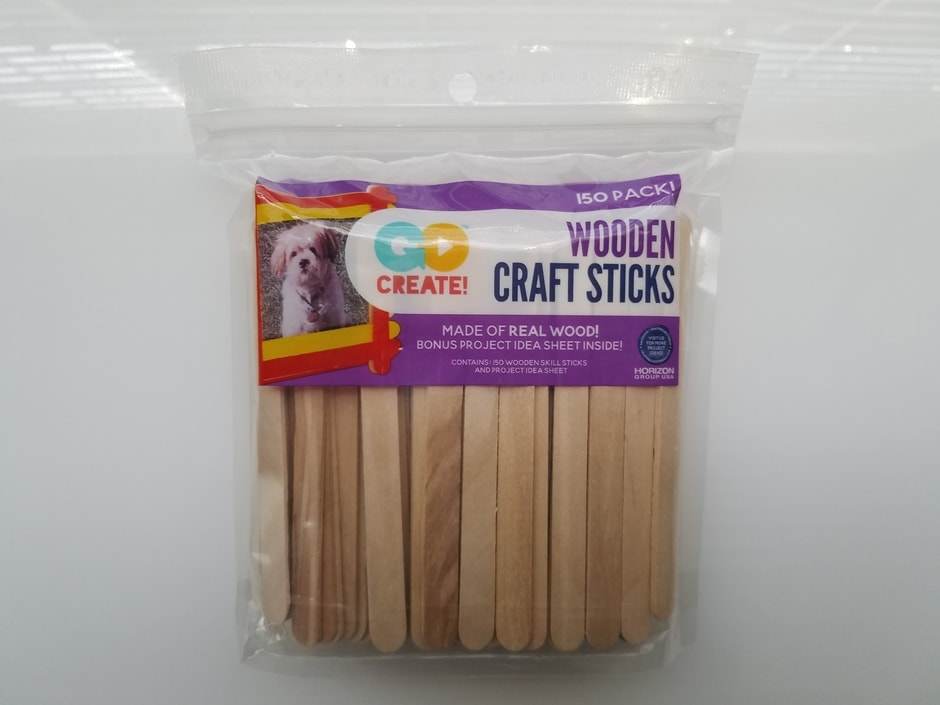
- A pack of popsicle sticks – ($3 for 150 pcs)
- A couple sheets of sandpaper or a small filing tool – ($2)
- A straight edge – ($3)
- An exacto / precision knife – ($5)
- A pen – (FREE)
- A cutting surface – (FREE)
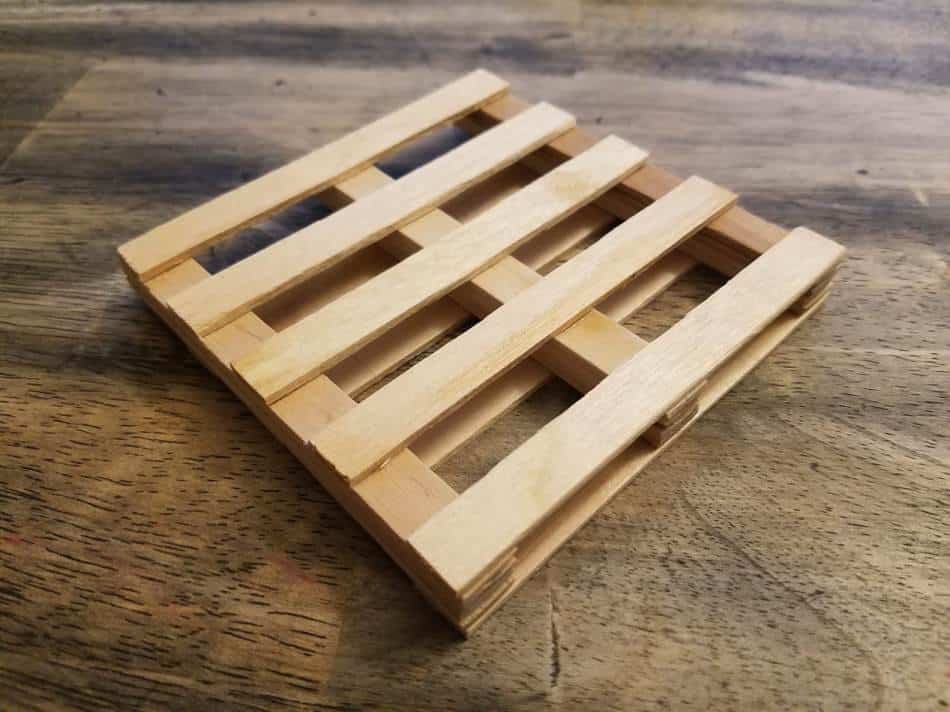
Mini-Pallet Coasters are cheap and simple to make and they’re super stylish.
A typical pallet’s schematic is 3 beams sandwiched between 10 boards, 5 on top and 5 on bottom.
The coaster that you can make by following the instruction below is an 8 board coaster.
The average coaster size is 3.5″ x 3.5″.
Step 1: Making the Boards
Assuming that your popsicle sticks is 1″ wide and at least 5″ long, go ahead and mark 3.5″ in length for 8 popsicle sticks. Once you have that go ahead and cut off the round ends.
(You might have to score it a few times with an exacto knife to get it to snap cleanly)
You should now have a 3.5″ x 1″ wide popsicle stick. Split that in vertically at the center giving you two 1/2″ pieces.
[I picked these up at Wal-Mart for a couple of bucks and I didn’t even have to split these vertically.]
Step 2: Making the Beams
If you don’t have any thicker wood piece for the beams you can stack the popsicle sticks to make the beam. A standard popsicle stick is 1/16″ thick, meaning you’ll need to stack 4 of them together to get a 1/4″ beam.
Since you’ll need 3 beams, you can make six 1/2″ beams with 12 popsicle sticks. Start off by doing the exact same thing you did above with the 8 popsicle sticks, measure 3.5″ and half them.
Some people like using hot glue, but I prefer using wood glue or super glue for my projects. Apply a thin layer of glue to the halved pieces and piece 4 of them together.
(Note: To maximize the bonding strength, piece them together when the glue is about 60-70% dry)
Realistically, you could probably get away with just piecing them together immediately after you put glue on it.
Once you have the three 1/4″ beams, you can put the boards on.
Step 3: Assembly
Put small dabs of glue at the polar ends of the sticks and glue them perpendicular to the beams.
Start by getting the outer perimeter of the pallet and work your way in. You can adjust the spacing between each board after securing the edges.
Make sure the two inner boards are evenly spaced apart, flip it over and repeat the process on the other side.
Step 4: Signature Touches
Now is the time to put some finishing touches and customize your coaster.
Sand off any imperfections and smooth out the edges with sandpaper or with a filing tool.
You can make a marker with a pen…wait…wut? I mean a logo.
You could also write some humor on the boards like:
“This Drink is Heavy” or “Haha, you’re a lightweight!”
Not my best jokes, so make your own!
2. Make a Key Holder
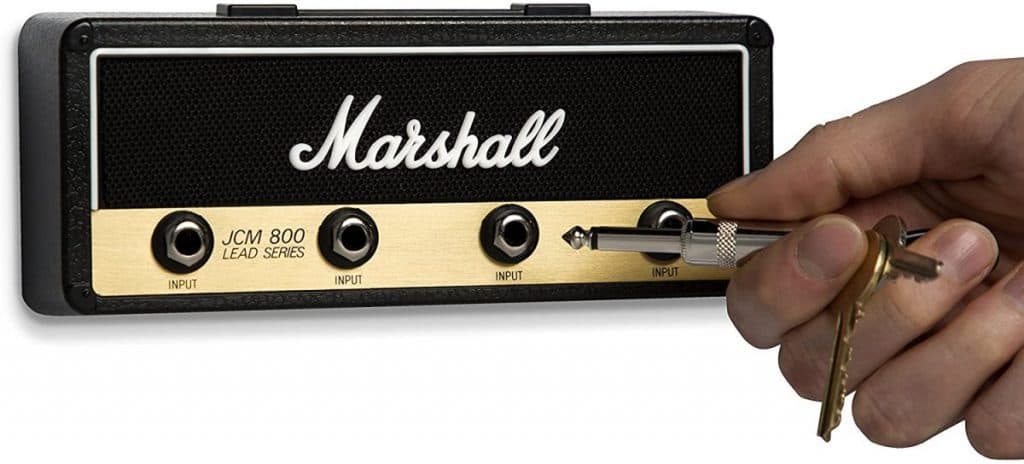
Getting tired of searching for your keys, but you also don’t want a lame looking key holder or toss your keys in a bowl? You can make your own wall mount key holder for under 20 bucks!
Here’s what you’ll need:
Approximate Cost: $19
- 3.5 mm Stereo Plugs Male Heads – ($4 for 5 pcs)
- 3.5 mm Jack Female Headphone Stereo Audio Panel Mount Plug – ($3 for 5 pcs)
- Rotary Power Tool – ($7)
- Split Key Rings – ($3 for 10 pcs)
- Wall adhesive / mount tape – ($2)
- Super Glue – ($1)
- A pen – (FREE)
- A scrap piece of wood or broken brick-style bluetooth speaker – (FREE)
[Any Drill involved in this project would be easier if done with a drill press, this is the alternative for anyone that can’t afford a drill or a drill press]
Step 1: Finding your mounting media
Start by getting your mounting media, look for a thin piece of board, maybe 1/2″ to 3/4″ thick. The wall adhesive is only going to hold light weight objects, so if you want to mount something a bit heavy, you’ll needs screws or nails, which is not factored in for this DIY project.
Try to keep the dimension of your board / mounting media to about 6″ x 3″.
Step 2: Mark and Drill
Measure and make 4 evenly spaced dots on your board, make sure it’s evenly spaced and center from the edges.
Next, drill 4 holes at where you marked your dots with your rotary tool. It may be easier for your to make a small indention on the dots so that the drill bit don’t wiggle and skew your holes.
Start with a small drill bit and increase the diameter as you widen the holes.
Step 3: Insert the panel mount
Once the holes are large enough to hold the female stereo panel mount, dab a little super glue on the panel mounts and slide it into the holes.
Step 4: Make a key chain
Let that sit and dry, next, you’ll need to drill a hole into the stereo plug (male), an 1/8″ hole should suffice. Drill the hole closer to the female end of the jack. You’ll want to make sure that the split key rings is able to slide into the hole.
Slide in the rings to the stereo jack and load up your keys.
Step 5: Mount the key holder
Mount the board on the wall with strips of wall adhesive tape.
Viola! You’ve made yourself a key holder! You can modify the design and the fabrication process however you like, but this will get you the bare-bone structure for further design.
3. Upside Down Planter
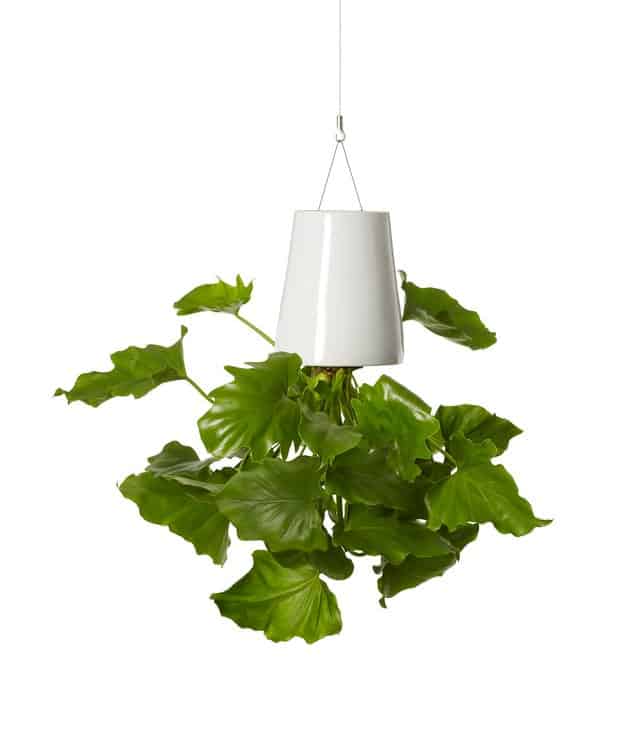
Do you like plants, but want to defy gravity? Ever heard of the “Hanging Garden of Babylon”? Well, you can make your own inverted plant and they freaking look awesome! Way better than your traditional right-side up plants.
Here’s what you’ll need:
Approximate Cost: $19
- A plastic container / plastic jar – ($1-$5)
- Rotary Power Tool – ($7)
- Small Carabiner – ($1)
- Paracord / String / Rope – ($3)
- Exacto Knife – ($3)
Since, you’ll be hanging the plant, I would recommend you use plastic or other flexible material for your planter, at least for your first go.
A plastic peanut butter jar or anything along that variation will do, so as long as it has a screw on lid.
In my opinion, it’s best to buy a plastic planter like the one shown above because it’s fairly cheap and easy to modify.
There are many ways of getting a plant to sit inverted, some uses a mesh to keep to the soil from fall out, but I think as a mean to not deter you from spilling dirt all over the floor, it’s best to use a screw-on lid.
Before you start, you may want to consider if you want to paint the jar, because this is the time to do so.
Go to an open and well-ventilated area and spray paint the color of your choosing. Use some scrap newspaper or cardboard to shield the spray paint from getting any unwanted surface.
First, flip your jar over with the opening facing down. If you have a drill, you can can start drilling a few holes on the bottom of the jar or on the two opposite ends on the side of the jar. If you don’t have a drill, you can punch a few holes out with a screw driver.
If the plastic if hard to puncture, you may want to just start out with using an exacto knife and cutting small slits by scoring over the surface a few times until you cut through.
(Be patient and do not over exert too much force when cutting, that’ll keep your hands safe from injuries.)
Drill or puncture two holes opposite of each other at towards the bottom of the jar. This will serve as the holes for hanging, now cut about 2 feet worth of rope and feed it through the two holes.
(If you plan on hanging it very from from the ceiling you may want to consider using more than 2 ft of rope, a larger base planter will also require more rope.)
Next, you’ll need to cut a hole that’s big enough that the stem of the plant can fit through. You’ll either need to drill a hole or cut a cross shape into the lid if you plan on using one and use a pair of pliers to peel back the plastic to open up the opening.
Feed the plant through the hole you cut in the lid, leaves first. (Do not transfer plant yet)
Time to pack some dirt into the jar! Fill it up 3/4″ of the way and transfer the plant over. Fill the remaining spaces leaving about 1/2″ or 1 cm of empty space from the brim of the jar.
Stuff some cotton balls in the gap, this will help absorb any additional moisture the plants don’t absorb.
Screw the lid on to the jar and lift the jar by the two ends of the rope that you’d inserted earlier. Pull it up so the two ends meet in the center and tie a knot at the distance you think it would look best.
Get another piece of rope and loop it over the knot and tie a slip knot.
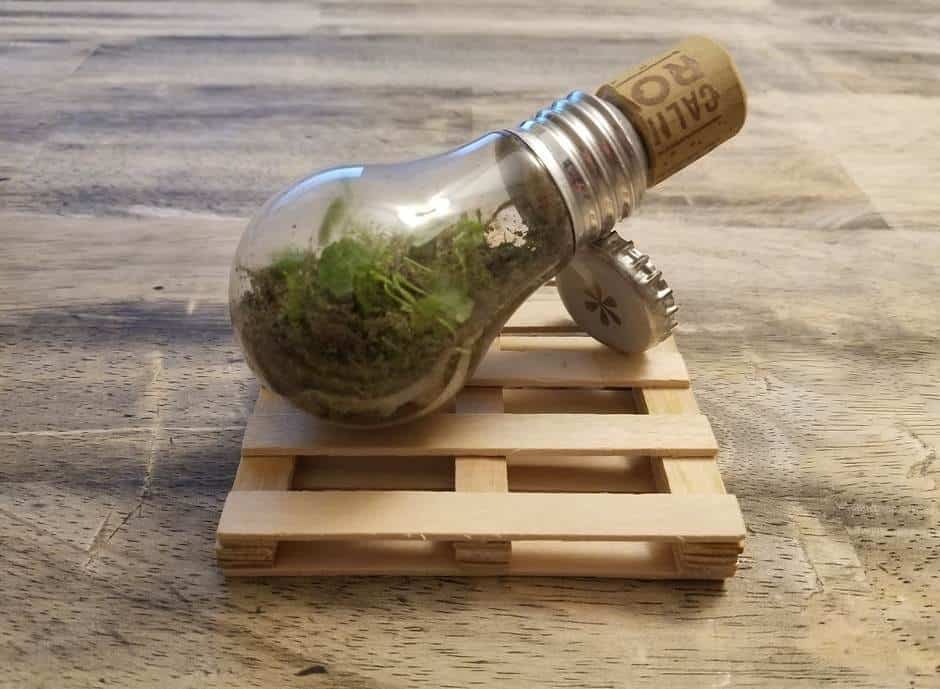
4. Lightbulb Terrarium
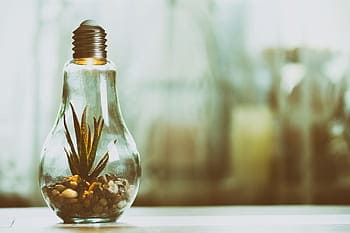
Want your own little ecosystem in your own home? Try one of these lightbulb / eternal terrarium.
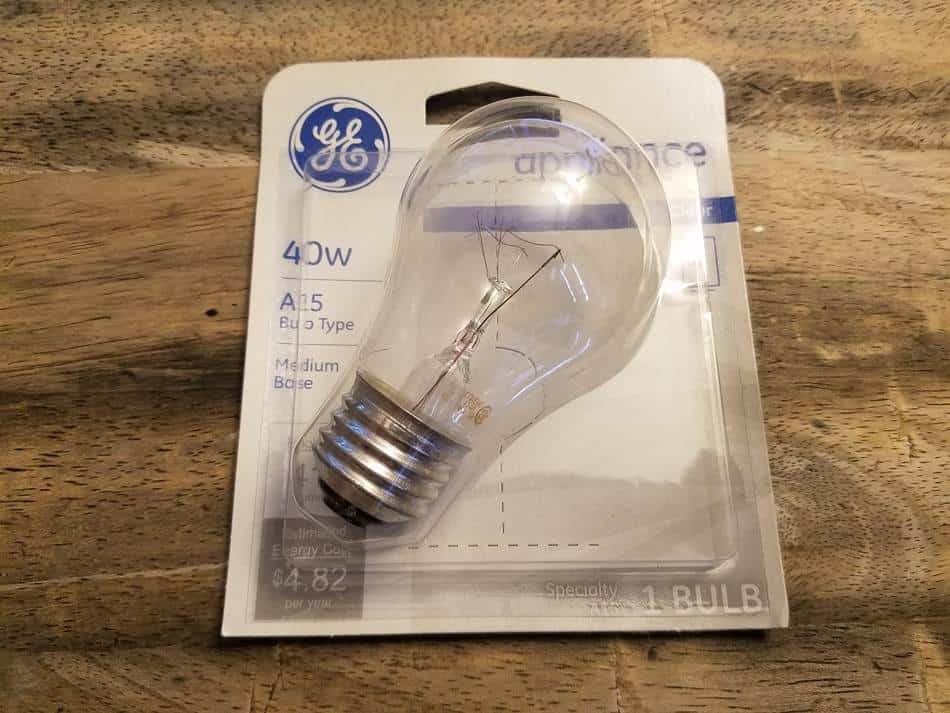
Here’s what you’ll need:
Approximate Cost: $8
- Old fashion lightbulb (Transparent Glass Bulb, not plastic) – Big and Round preferred. – ($2)
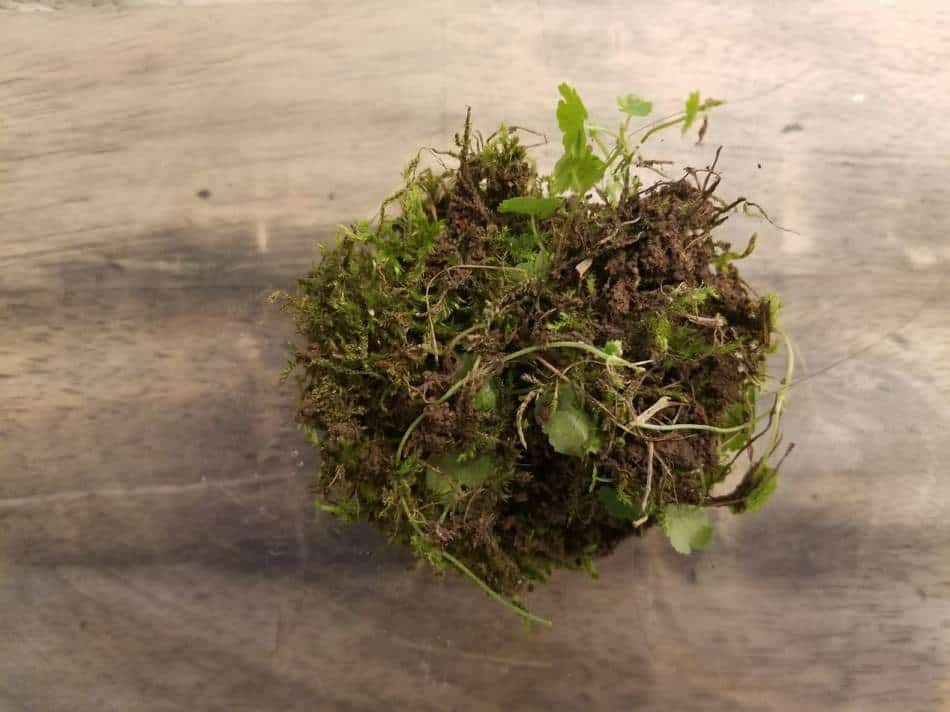
- Little pebbles – (FREE)
- A little bit of moss – (FREE)
- Acorns – (FREE)
- Small twigs – (FREE)
- Dirt – (FREE)
- A pair of needle nose pliers – ($3)
- A flat head screw driver – ($2)
- Newspaper / sheets of paper – (FREE)
- A cardboard box or a plastic bin – (FREE)
- A bottle cap (FREE)
- A piece of Wine Cork (FREE)
First, you’ll need to spread out some newspaper and put the bulb in the plastic bin or cardboard box, these are used to catch the broken glass when you work on it.
Start off by hollowing out the bulb.
Take your needle nose pliers and peels back the piece of brass circular plate at the bottom of the bulb. Once that plate has been peeled off, it should create an opening.
Use the screw drive and use it as a fulcrum to break off a few piece of the black glass. Use the pliers to remove any additional glass that didn’t break off.
The opening should be bigger now.
Next, insert the screw drive through the opening and break the glass fuse on the inside, try not to put too much force to avoid breaking the bulb.
Clear out any glass that’s inside the bulb.
Once that is done, break loose and glass you may have missed at the opening.
Go out to nature and find some nature looking stuff and make sure you’re to fit it through the opening of the bulb.
Take a sheet of paper and curl it into a funnel shape and pour in the dirt, pebbles, or anything else you collected slowly at a 30 – 45 degree angle.
Take a pencil or a tweezer and adjust your terrarium as you see fit.
Get a cork or a thicker stick that’s about the same diameter as the opening and cut it down to 2″ length to serve as a plug.
Plug up the bulb and place the bulb on stand.
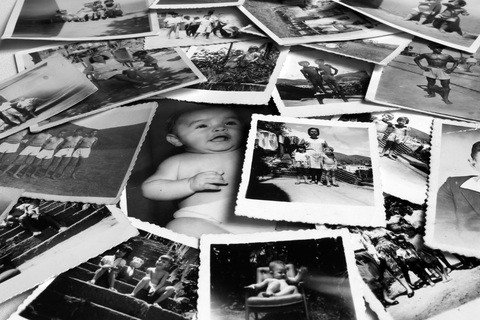
5. Time Capsule
It doesn’t matter where you’re at in your life, I think everyone should try their best to preserve some part of their past and solidify their memories.
What better way to do that than to bury a time capsule, especially in one of the most unprecedented time of our lifetime. Perhaps one day you’ll open your capsule and remember all the things you did while staying indoors during this time.
So, let’s make one!
Here’s what you’ll need:
Approximate Cost: $17
- A mason jar with a lid – ($3)
- Hot Glue Kit – ($6)
- Desiccants – ($5)
- Zip-lock bags – ($2)
- Memories you want to store in the capsule – (FREE)
- Grease ($1)
The primary feature of what makes a time capsule a time capsule is the ability to withstand the change of time.
This means the container needs to be airtight, durable, corrosion resistant, and waterproof. This is especially true if you plan on burying it, water have a way to permeable any container if given an opening, even on a microscopic level.
To ensure that your time-capsule survives the test of time, you’ll need to make it as tightly sealed as possible.
To start off, go and scavenge for the memories you want to store.
Here are some good examples to get you on your way:
- Photographs
- Rings / Charms
- Game Pieces
- Letters to yourself from the past
- Predictions of the future
(It doesn’t matter what it is so as long as it brings good memories and it fits the jar.)
General Rule of Thumb for Preservation
Any paper or items that will naturally absorb moisture will need to be accompanied with desiccants.
Any metal items such as jewelry or metal charms, I suggest that you coat it in a thin layer of grease, this will help keep the metal from corroding or tarnishing by creating a thin membrane to shield from oxidation.
If you DO plan on burying your capsule, follow these instruction:
Put your memories in a zip-lock bag, seal it and put it in the jar. Close the lid tightly and hot glue the seams where the lid meets the jar. Try to seal it to the best of your ability, excess hot glue is fine.
(Full Disclosure: I would not recommend you store any mementos or keepsake items that are close to you personally in this $20 time capsule, especially if you are burying it. Get something a bit more professionally made to best preserve your special belongings.)
The biggest challenge with time capsule when burying is moisture. Rain, ground water, moisture can get into your capsule easily if not properly sealed.
The last thing you want is to bury a jar full of money, just to have it turn to dried mud and crumble away. Similarly, photographs and letters will behave the same way.
Dig a hole in a spot only you and your close ones knows where the location is at. Preferably not in an area that may undergo construction in the next 10+ years.
Mark the spot with a signature touch, so when you do go back and retrieve it, it’ll be easy to find.
If you DO NOT plan on burying your capsule, follow these instruction:
Follow the general rule of thumb and store your jar in an area of low humidity and preferably away from sunlight.
Sunlight will cause discoloration of the items and silver oxidizes and turns black faster with more exposure to light and high humidity.
Store the capsule in a box and mark or label it. Put it in area that’s close to the ground to avoid it falling and smashing to pieces.
I personally feel that the best thing about time capsule is the unearthing process. It’s like digging up treasure, but not necessarily of fortunes, but of good times.
Final Step
Probably the hardest part about it all.
Waiting…
Still waiting…
So much waiting…
And there you have it, 5 hobbies to keep yourself occupied during these interesting time. So stay in and get crafting!